Saturday, April 24, 2010

Meatballs


This week, I made Biscuits with Easter Ham for a potluck and we had chicken pot pie again, leftovers and spaghetti with meatballs. Again, it was a light week of cooking...sort of.

I decided that since we have pasta with sauce once a week, I should probably make enough of this sauce for at least 2 meals for us. So, the recipe makes PLENTY

Here is the breakdown for these meatballs and sauce:

As you may have already read in this blog, I try to load up store-bought sauce with more veggies and this time was the same. Carrots and onions were added along with some Italian Seasoning. Cook until the carrots are soft and then use an immersion blender to puree it all together. To the sauce, I added raw meatballs *it is important to note that I use REALLY lean beef so I don't have a lot of grease floating on top of my sauce after the meatballs cook in the sauce. If you would rather drain the fat, you can cook the meatballs in a pan but that makes them lose their shape so I prefer this way.

1lb of ground beef.
2 T Garlic Bread Seasoning* you can use fresh garlic or garlic seasoning
1/2 C breadcrumbs - you can use seasoned breadcrumbs if you want.

Combine together and form into balls - I like making lots of small ones so mine are no larger than quarters. Drop each ball into the pot of sauce and allow to cook for about 20 minutes.
I actually did this process around 3pm and let it cook for about 2 hours on medium-low heat. At 5 o'clock, I took it off the heat completely and let it sit - without stirring. When the grease did pool on the top, I skimmed it off and then stirred it all up when we were ready to serve.

Another tip is: if you boil your noodles and need to reheat them and get them unstuck from each other, you can place your metal colander in a pot with about 2 inches of water. Bring the water to a boil and steam the noodles back to life.


I found a really great mixed lettuce item at BJs Wholesale and have enjoyed using these Artisan Lettuces throughout the last couple of weeks.


My kids aren't into salads yet so I made them veggies with dip as a side to this already veggie-rich meal.


*This is a Tastefully Simple Item and can be purchased from a friend of mine - a link to her web page is on in the Resources section of this blog. I don't receive compensation from Tastefully Simple or Kira Reeves for purchases made as a result of this blog.

Thursday, April 15, 2010

Crockpot Pork Sandwiches


I have already posted this recipe here but I switched it up a bit. I learned how good onions are for your general health - including lowering cholesterol and reducing muscle and arthritis inflammation so I decided to add them when I can in everything I make. So, I sliced an onion and put it in the Crock Pot along with 6 pork loin chops and the BBQ Sauce.

I cooked it for 8 hours and pulled the meat apart before serving it on buns. The kids had hot dogs before tee-ball practice so we scoffed these down when we got home at 8.

Wednesday, April 14, 2010

Tortelloni with Veggies


Before you ask why I made Tortelloni instead of Tortellini - it is what I bought and had in the pantry. Before you ask, "What is the difference between Tortelloni and Tortellini?" Tortelloni is bigger.

I boiled the Spinach and Ricotta filled Tortelloni according to the package directions and heated a Family Size Package of Green Giant Broccoli, Carrots and Garlic Sauce in a sauce pan.
After the Tortelloni boiled for 10 minutes, I added them to the broccoli and tossed it all together.
Served in a bowl topped with shredded Parmesan Cheese - it is really an easy and delicious meal!

Tuesday, April 13, 2010

Shepherd's Pie


I am making ahead today and spending the same amount of time on two dishes as I would one.

I made Shepherd's Pie using ground turkey and ground beef. Sadly, I realized half way into it that I didn't have any Worcestershire Sauce so I used Sticky Fingers Sweet Southern BBQ Sauce. Mrs. Beeton is probably rolling over in her grave!

I also put in some carrots and peas - not present in a truly traditional Shepherd's Pie recipe...at least not in Mrs. Beeton's.

Here is the gist of this dish (mind you, I made two and that is what these measurements will give you too - or you can make ONE BIG ONE!)

You will need 2 Pie Pans or 1 large shallow baking dish (it will all probably fit into a casserole dish too). Spray them with non-stick spray and set them aside.

2 T Olive Oil
2 Medium Onions, Chopped
3/4 C to 1 C Chopped Carrot (about 10-12 baby carrots)
3 T All Purpose Flour
1 C Chicken Stock - or any stock you have on hand
2 Lb Ground Meat (I used ground turkey and 93/7 Ground Beef)
2 T Tangy BBQ Sauce but you SHOULD use Worcestershire Sauce if you have it
1 C Frozen Peas
3 C Chopped Peeled Potatoes (about 5 medium potatoes)
1/4 C Milk (Soy Milk) or you can use stock
dash of nutmeg
Salt and Pepper

Boil the potatoes for 30 minutes or until tender. Meanwhile, heat the Olive Oil in a large skillet over medium-high heat. Add Onions Carrots and cook until the onions are translucent but not browned.


Sprinkle in the Flour and cook, stirring constantly for 2 minutes.
Gradually add the Stock and cook until the sauce thickens. Add the Ground Meat and stir, breaking the meat up in the mixture. Add the BBQ Sauce, Salt and Pepper to taste, and Peas. Stir to combine. Simmer over medium heat for 30 minutes.

Drain the potatoes and mash together until smooth with the Milk or Stock or combination of the two, Nutmeg, and salt and pepper to taste.

If you find the sauce in the meat mixture to be too thin, add more flour and stir until it thickens up.

Divide the meat mixture between the pie dishes or the casserole dish.
Spread the mashed potato mixture over the top of the meat and veggies. Use a fork to make peaks in the potato.
If you are cooking ahead, go ahead and cover the dish and let it cool before putting it into the freezer.

When you are ready to finish it off, cook it in a 425 degree oven for 10 to 15 minutes, until the top browns.

Enjoy!

Monday, April 12, 2010

Chopped Chicken Salad


Last summer, I got into making chopped salads and with the recent warm weather and a refrigerator that includes some baby spinach that needs to be used, I decided to whip one up tonight. As a note, when I make salads, I deconstruct them for the boys and make a plate of cut veggies, cheese, and protein - tonight, the protein was the rest of the salsa chicken from Friday night.

Here is the basic idea along with the ingredients for this Mexican flavored chopped salad.

Serves 2 with components for 2 child plates

1 Grilled Salsa Chicken Breast, chopped
1/3 C Corn
1/2 C Chopped Carrots (about 5 baby carrots)
4 Grape Tomatoes, quartered
2 Celery Stalks, chopped
1/4 C Chopped Colby Jack Cheese
2 C Chopped Baby Spinach

Toss all of the above ingredients together in a bowl.

In a separate small bowl, combine 2 T Light Ranch Dressing with 3 T Salsa Verde or your favorite tomato salsa.


Add dressing to the salad and toss to cover completely. Serve alone or with bread, chips, or crackers.

Other components that would do well would be black beans, avocado, cilantro, lime juice, and tortilla strips.

Sunday, April 11, 2010

THE Birthday Breakfast Sandwich


The only request for birthday food from my husband was a bacon butty. We don't have access to back bacon, only bacon strips (crispy) so I decided to recreate a delicious breakfast sandwich we had at a diner on our honeymoon.

Components for 1 sandwich:

1 Hamburger bun
2 Eggs
1 Slice of American Cheese
3 Slices of bacon

Game Plan:
  • Fry bacon
  • Place bun, cut side down, onto hot bacon grease and fry for about 15 seconds, maybe a little longer - make sure the oil is hot so you actually fry the bread and not let the bread absorb the grease.
  • Lightly scramble the egg and then fry it in the pan so it all stays together.
  • Place the egg on the bottom bun, top the egg with the bacon and cheese and then cover with the top bun.
    Serve with hot tea or coffee, orange juice, and slices of strawberries for your honey...happy birthday to THEM!

Dark Chocolate Cherry Birthday Brownie


As I have mentioned in the past, this project has forced me to take chances and try out new ideas combining a variety of ingredients that I have on hand to make new food.

My husband's birthday is today and he loves chocolate cherries. I knew that I had some leftover light cherry pie filling from a dessert I made a while back. I knew it would be a while before I used cherry pie filling again so I froze it in a zippy bag. I also knew that I had scored a good stockpile of cake mixes and brownie mixes. I thought, chocolate cherry brownie as a birthday "cake" would be great since we are pretty caked out from recent birthday festivities.

Also, because of recent birthday cakes, I have leftover frosting, not to mention a bowl of chocolate truffle mixture that was going to be an Easter treat but never came to pass. Without spending a great deal of time on the subject, we were going to make these with the boys on Easter but the day got away from us and it took longer than the prescribed 30 minutes for the chocolate to set up. We were well into bedtime before it was going to happen so it...well...it didn't happen. As a result, we have a bowl of 2 cups of melted chocolate chips mixed with 1 container of melted Betty Crocker Chocolate Frosting. There are worse things to have stocked in your fridge.

So, here I was with dark chocolate brownie mix along with the oil, water, and eggs required to make that happen, 1 Cup cherry pie filling, a tasty bowl of truffle mix (again, that is 2 cups of melted semi-sweet chocolate chips and 1 container of Chocolate Frosting, melted), and some leftover confetti frosting (the white kind with the candy bits).

I followed the package directions and used a 13X9X2 inch pan for the brownies, adding some of the cherry pie filling juice to the batter. Once the batter was mixed and spread into the pan, I melted the chocolate truffle mixture in the microwave and stirred in the cherry pie filling. I very carefully drizzled the chocolate cherry mixture on top of the brownie batter until there was a smooth layer of melted chocolate cherry.

I baked it for 30 minutes at 325 degrees and started to worry because it was all still very liquid and the brownie should have been done. I covered it with tented aluminium foil to keep the edges from burning and let it cook for another 10 minutes. The brownie mixture started cooking away from the sides and I lifted the pan and saw that the bottom had set too. It dawned on me that there was melted chocolate and frosting on top and if that was even a little warm, it would be liquid. So, I took a leap of faith and pulled the pan out to cool.

It cooled completely and the whole thing set up beautifully. I do recommend making this several hours before and refrigerating it or making it a day ahead. I made it yesterday so this morning, I heated the confetti frosting and drizzled it over the top to make it more festive. I must say, these are worth the trouble beacuse they are absolutely delicious.

Guacamole

Homemade Guacamole

To serve 4 adults and some children a snack portion, I used 3 avocados but you can certainly expand this recipe as needed and add flavors that suit your taste.

3 Avocados
1 T Salsa
1 T Tomatillo Salsa Verde (it is green and you can buy it where you get jars of salsa)
1/2 t Salt - or more if you need it
1 t chopped garlic or dried garlic seasoning
1 T lime juice

Slice the avocados and remove the stone (I stick it with the blade of my knife and then ease it off the knife by pinching the side that is wedged into the knife), either peel away the outside or spoon the avocado into a bowl. Mash with a potato masher. Before you mash it all, add the rest of the ingredients. Continue to mash the guacamole until you have it at the consistency that you like. I like mine to be a little chunky.

Serve immediately - the avocado turns brown as quickly as an apple does and while the citrus juice slows this process down, you can't save it for later.
You might also like:

Cheese Sauce

I refer to this "base" recipe in a lot of postings so I decided to post it separately so it is easy to use as a reference tool. This can be made dairy free - as posted here with the chicken stock or you can use cows milk or soy milk instead and you can use cows milk cheese as well. It is very versitile and can be used within recipes or alone for chips and cheese dip!

2 T Oil
2 T AP Flour
1.5 C to 2 C Chicken Stock
3 Slices Cheddar Flavored Veggie Slices Soy Cheese. Rice Cheese also works well for this

Heat the oil over medium-high heat and add the flour, whisk the flour and oil together until it starts to smell nutty, just a couple of minutes. Slowly add the chicken stock whisking together until the lumps are all gone and it starts to thicken - you have just made gravy, by the way. Add the cheese and let it melt completely. DONE! Add this sauce to elbow macaroni or use it to top broccoli, potatoes, really anything you would use a cheese sauce on.

Saturday, April 10, 2010

Nacho Heaven


One of the very best foods in the whole wide world is Nachos. I truly believe that it unites people and is so varied in its interpretation, it can satisfy all tastes. It is universal, honestly, I believe it! Making a large plate of nachos is one of the stay-in date-night rituals in our house. Served alongside some cold beers or cocktails in front of a flick with my main squeeze...heaven!

Friday night turned into Nacho night and I broke into the stockpile of leftovers and devised this beauty:

Nacho Components:

Store-bought Tortilla Chips
Shredded and chopped Grilled Salsa Chicken (Recipe Below)
Cheese Sauce (Recipe HERE)
Refried Beans (Recipe Below)
Guacamole (Recipe HERE)
Store-bought Sour Cream
Store-bought Salsa
2 T Fresh Cilantro from my garden - chopped and optional

Grilled Salsa Chicken:
Before I froze some chicken breasts, I sprinkled them with 2 T Simply Salsa from Tastefully Simple along with 1 t Olive Oil. I covered them completely with this mixture and froze them. When they thawed, they were ready to go onto the grill. Voila! Grilled Salsa Chicken. If you don't have any Simply Salsa, you can use any seasoning mix that you like or actually toss in some jarred salsa or salsa verde...your call! If you don't have any already marinated, just marinate the chicken for at least 30 minutes. If your mixture has vinegar or citrus, don't marinate overnight because that acid breaks down the chicken and makes it mushy.

Refried Beans
If I had known that nachos would be among the menus for this period, I probably would have bought a jar of fat free refried beans. Well, I didn't...so, I didn't. Necessity is the mother of invention and this project has born a lot of homemade things that otherwise would have been store bought. I either make it from scratch or we go without. I decided NOT to go without this time and really wanted refried beans. I also decided to "wing" it. It turned out really good. I guess I am lucky that I stock these things in my pantry. Here is how it went down.

1 Can Light Kidney Beans, drained and rinsed
2 Chipotle Peppers in Adobo (they come in a small can with a flip top)
1 t Olive Oil
1/2 t Tastefully Simple Garlic Garlic (you can use real garlic or garlic seasoning)

Mix all of these together and use an immersion blender to puree. It will be the consistency of hummus. Heat in a saucepan over medium heat until some of the moisture is evaporated. Serve warm.

Build a better Nacho Platter:

I always build in layers because I don't like getting to the bottom of a platter of chips to find naked chips with no topping. Spread a layer of chips, drizzle with cheese sauce and some dollops of beans. Make another layer of chips and continue with the cheese and beans but sprinkle some chicken as well. Keep going until you have all of the cheese, beans, and chicken covering many layers of nachos. Finish with rows of guacamole, salsa, and sour cream. If you have cilantro, sprinkle it on top. If not, you can skip it.

Thursday, April 8, 2010

Jerk Pork Chops and planning ahead

My husband surprised me with a brand new grill last weekend and I was excited to christen it with pork. I bought a pork loin a while back, cut it into pork chops and froze them into meal servings. While I knew that I would be firing up the grill and spending some time waiting for meat to thaw, I decided to go ahead and pull out some chicken that I seasoned with some Tastefully Simple* Salsa seasoning.


Here is the recipe for the Jerk Pork Chops. Stay tuned for the recipe for the chicken!

6 pork chops, about 1/2 inch thick
1 T Jerk Seasoning (I use McCormick's)
1 T Olive Oil
1 T Soy Sauce
1 t Cider Vinegar

Combine the above and marinate the pork chops for 30 minutes.
Cook them over a preheated medium-high grill, grill pan, or under a broiler. Depending upon the thickness of the pork chop, you may need to go longer or shorter...just PLEASE don't overcook the chops, they dry out and become very tough. They should cook until the juices run clear and there is no longer any pink.


I served them with peas (for the kids), a green salad (for the adults), corn on the cob (which also hit the grill), grilled slices of pineapple, and some leftover orzo to which I added jarred Mango Chutney.


There was no hope in getting my boys to try anything "jerk" so I just grilled pork chops for them and served them with ketchup - you do what you have to.

* I have a friend who sells Tastefully Simple as a home-based business. I have added a link to her website on this blog so if you are interested in buying any of the items I mention, you certainly can. I don't make any money by recommending the items. I just like them and help to support her business by buying from another stay-at-home mom.

House Guests eating leftovers

I haven't posted because I haven't been cooking! Our house guests arrived on Monday afternoon and we ate leftover fried chicken from Saturday. You are probably thinking to yourself, "why is this woman feeding guests leftovers?!" Well these are really good friends and they don't need me to cook for them to know that I love them. So, we ate good, delicious food...I just didn't have to stand in front of the stove to make it happen.

Tuesday we had pizza while we went fishing at the wharf and that night, we went out to eat at Buddy's Crabs and Ribs in Annapolis.

Wednesday we took everyone into DC for a day of touring and ate at Hard Rock Cafe. When we got home, we reheated some breadsticks from the "fishing Pizza", boiled some spaghetti noodles and heated up the sauce from last week's Birthday Supper.

We also have been doing some world class snacking that includes homemade guacamole and chips (see recipe below) and a plate of late-night snacks including Easter Ham, Cheese, Sliced Bread-cut into quarters, Dijon mustard, pepperoni, apple slices, and clementines. Time went by quickly but not cooking truly made it feel like I was on vacation too!

Homemade Guacamole:

To serve 4 adults and some children a snack portion, I used 3 avocados but you can certainly expand this recipe as needed and add flavors that suit your taste.

3 Avocados
1 T Salsa
1 T Tomatillo Salsa Verde (it is green and you can buy it where you get jars of salsa)
1/2 t Salt - or more if you need it
1 t chopped garlic or dried garlic seasoning
1 T lime juice

Slice the avocados and remove the stone (I stick it with the blade of my knife and then ease it off the knife by pinching the side that is wedged into the knife), either peel away the outside or spoon the avocado into a bowl. Mash with a potato masher. Before you mash it all, add the rest of the ingredients. Continue to mash the guacamole until you have it at the consistency that you like. I like mine to be a little chunky.

Serve immediately - the avocado turns brown as quickly as an apple does and while the citrus juice slows this process down, you can't save it for later.

Sunday, April 4, 2010

Easter Dinner


I can't remember an Easter dinner that I cooked before today's. It could be because I have never made a huge effort for Easter dinner or it could be because it wasn't terribly memorable. Either way, this one is noteworthy because of its ease of preparation and taste. If you are looking for an Easter meal, try this one. You will hear lots of yummy noises from the table and they won't be drowned out by your "dogs barking".

Menu:
Balsamic Glazed Ham
Dairy Free Scalloped Potatoes
Sauteed Asparagus
Deviled Eggs
Frozen Steamed Veggies in sauce
Gherkins
Dairy Light Banana Pudding

Our church service is from 10:30 until 11:30 so by the time we get home, it is nearly lunch time and no time to put together this giant meal. So, there is a bit of a game plan. After breakfast, I prepare the glaze and pour it over the ham and cut and prepare the potatoes for the oven. If I had thought about it, I probably would have gone ahead and made the deviled eggs too but that was a last-minute addition so I did it when the ham was cooling.

Ham:
I bought a ready-to-eat spiral sliced ham from the store last Sunday and it was on sale - bonus! I followed a Betty Crocker recipe for the ham and it was easy (3 ingredients). Clearly, it was unnecessary but I like to add my little touch to ready-to-eat items anyway.

1/2 C Packed Brown Sugar
1/4 C Balsamic Vinegar
1/4 C Dijon Mustard

Combine in a small bowl and pour over ham. I had the ham in a large roasting pan and covered the whole thing with aluminium* foil to be ready for the 325 degree oven for 90 minutes when we got home from church.


Scalloped Potatoes:
My son is lactose intolerant so I have a trick for dairy free scalloped potatoes.

5 small white potatoes, washed and thinly sliced
1 medium onion, sliced and separated into rings
salt and pepper to taste
2 T olive oil
2 T All Purpose Flour
5 slices Soy Cheese
3/4 C Soy Milk

Grease a small casserole dish and place one layer of potato slices, overlapping each other slightly, into the dish. Cover with a light layer of onion rings and salt and pepper to taste. Tear or cut one slice of soy cheese into 5 strips and place the strips on top of the onions. Repeat until you have it filled to your liking (about 1/4in from the top is where I stopped which meant that I used 3 slices of cheese) and leave the top layer as potatoes and onions - no cheese.

In a saucepan, heat the olive oil over medium-high heat and add the flour. Whisk until combined and allow to cook while whisking for about 30 seconds. Add the soy milk and bring to a slow boil. Once it is boiling, add the remaining 2 slices of cheese. Stir together until the cheese melts and pour this cheese sauce over top of the potatoes.

Since this was going in with the ham, I covered it with aluminium foil and set it aside. It went in with the ham, covered, and I uncovered it about 15 minutes before the ham was due out. It still wasn't brown enough for my taste so I turned the broiler on and finished it off.


Sauteed Asparagus:
To trim asparagus for cooking, gently try to break it off at the end with one hand in the center and one hand near the bottom. It will break at the natural point where the woody part begins. As a tip, if you have a lot to do and it all came from the same bunch from the store, it is safe to say that they all will break at about the same point. You can break the first one and then line them all up with the first one to cut at the same place.

Heat a skillet to medium high with a drizzle of olive oil. Place the asparagus into the pan and salt and pepper to taste. Cover and toss around every couple of minutes. Asparagus has a lot of sugar in it so it will brown and burn quickly. It is done when it turns bright green with some browning but is not limp.


Deviled Eggs:

We are but a family of 4 and our children are under 5 so I only used 3 of our Dyed Easter Eggs for our Deviled Eggs.

For 6 Deviled Eggs:

3 Hard Boiled Eggs - use fresh eggs and add salt to the water to help the shells release
2 T Mayonnaise
1 t Pickle Relish
Salt and Pepper to taste

Peel and slice eggs in half, longways. Separate the yolks into a small bowl and place the whites onto a pretty plate - or a plain old saucer like I did. Add the mayonnaise, relish, and s&p to the yolks. Mash the yolks and stir until smooth. Spoon the yolk mixture back into the wells in the egg whites. If you desire, sprinkle with paprika or top with chopped chives before serving.


Frozen Veggies in Sauce Steamed -
I buy these a lot in many varieties and today I just looked in my freezer for one that had a different color than what I have already on the menu.


Gherkins - literally, I opened a jar and put them on the kids' plates.

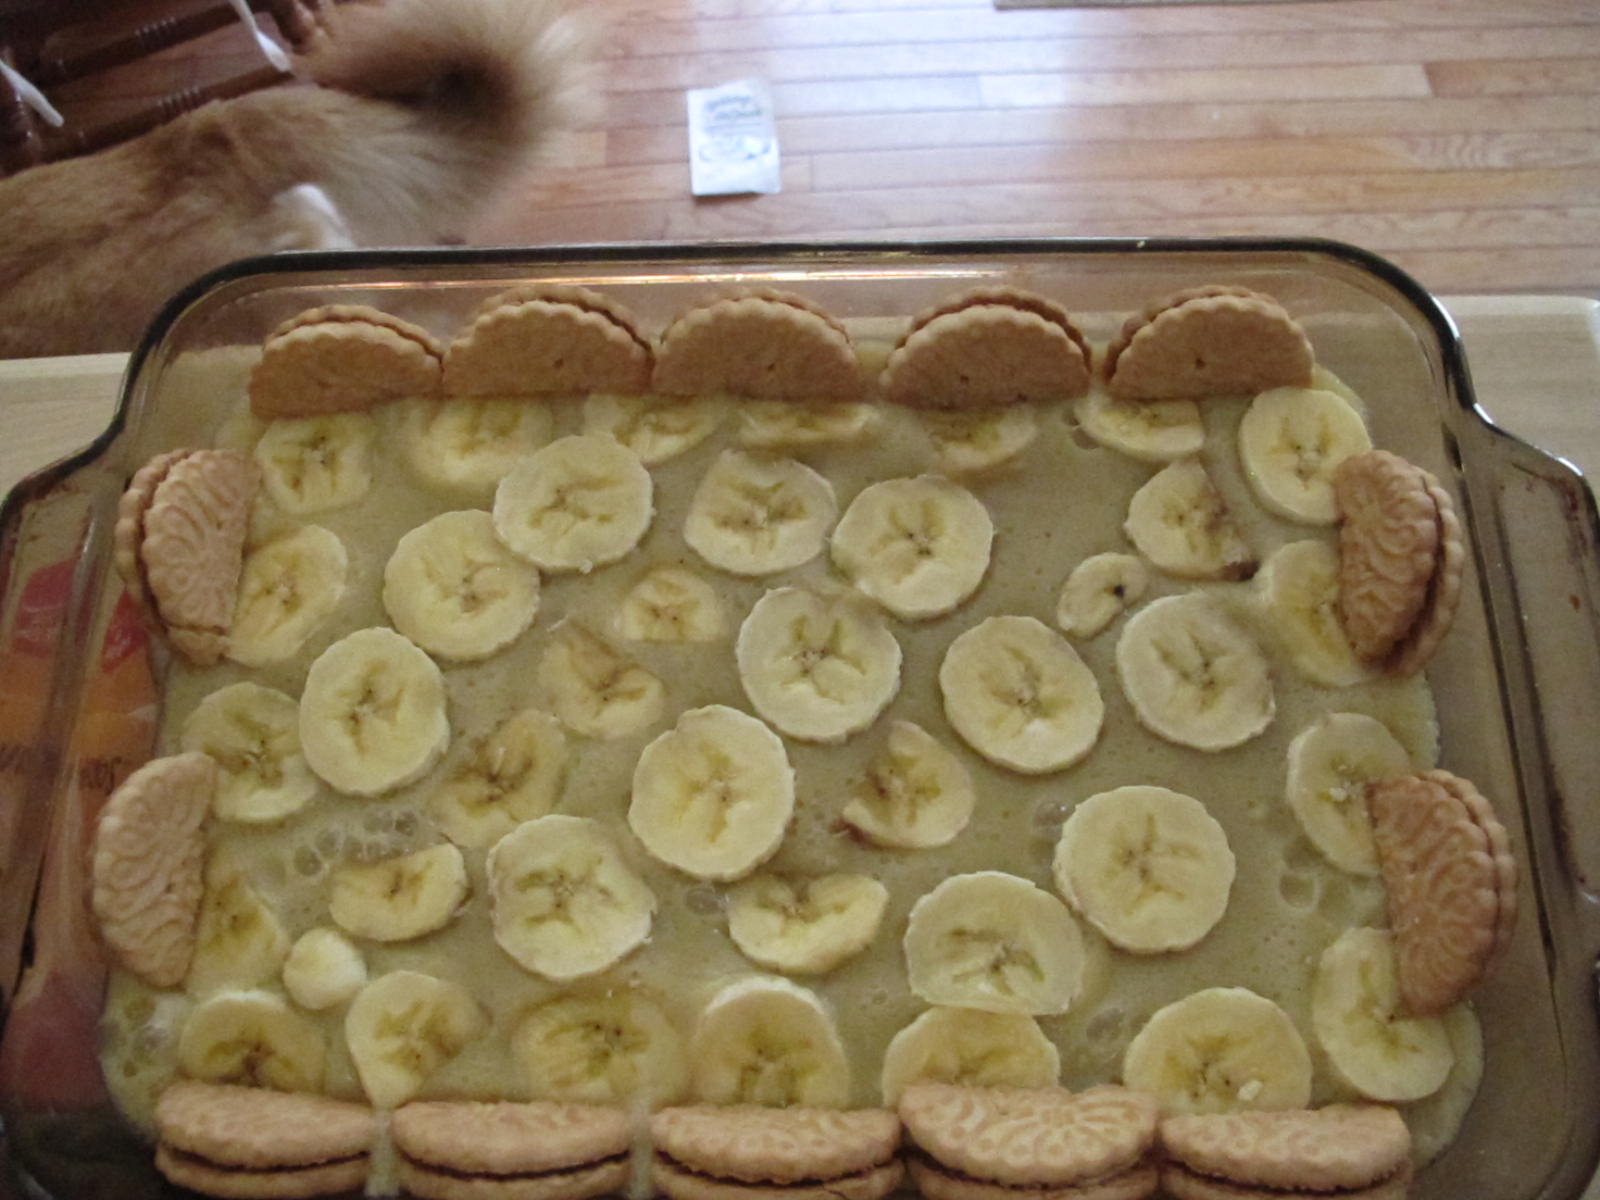
Dairy-Free Banana Pudding turns into dairy-light banana pudding with cookies that have dairy.

So, my son is lactose intolerant. He does not have a dairy allergy; therefore, he can have products that have some milk in them but he can't have cows milk, yogurt, or cheese.

I called a friend with experience to ask if she had ever made pudding with soy milk. She said, "Yes, but it never sets." Bugger! I didn't plan to make a dessert today but my bananas are on their way out and I really wanted to fill the time this ham is cooking...So, here is how it went down.

I looked in my pantry and found that I have the powder for Bird's Custard which is basically cornflour and flavorings so it is on the "okay" list for my dairy restrictions. So, I followed the instructions but added a little soy milk to a bowl with 1 and 1/2 banana and, once again, used my immersion blender to puree it and added that into the custard.

I covered my 9x13 dish with vanilla sandwich cookies because that is what I had. They aren't dairy-free but any cookie will do. I used 15 cookies for the bottom(3 rows of 5) and poured the custard on top of the cookies and cut 7 more cookies in half to line the sides (5 halves on each side and 2 halves on each end). I sliced another banana to cover the top. It set up almost immediately and when we ate it it was still warm and, incidentally, delicious. My oldest son took one bite, got down from his seat, wrapped his arms around me and said, "Thank you, mama." Need I say more?


*My husband is British and we became educated on the proper spelling and pronunciation of aluminium. I am trying to help this lost cause by using the proper IUPAC spelling

BFF Fried Chicken

We are fortunate enough to have a long list of really wonderful friends in our lives. True friends...the ones that love you (warts and all) and I couldn't be happier to have them, honestly! It is because of these friends that I know life is good for me now and always will be.

I always want to treat these friends with the very best, healthy, and tasty food that I can produce from my kitchen. We Southerners love with our food and I hope that my friends know about the love that went into the fried chicken and green beans that I made for this pot luck. I thought about each person who would be eating the chicken as it fried and I put the love in every time I turned a piece over. Anyone can make fried chicken, the best fried chicken is made almost ritualistically. Here are my rituals as prescribed by the best Fried Chicken Cook - aside from Mama and Grandma - that I know, my BFF, Kelly. Incidentally, Paula Deen and my Mama have confirmed this process of frying and steaming.

Let me make note now to all of you "OMG, FRIED Chicken!? That will clog my arteries!" people: Fried Chicken is comfort food and celebration food. It used to be only Sunday Dinner food because chicken was not so easy to come by. It is soul food. Brought from Scotland to the South by immigrants and perfected by slaves from Africa, it is good food. It is NOT particularly good for you. Neither is Birthday Cake but I doubt anyone who is reading this blog has ever gone too long without a piece of Birthday Cake. Think of Fried Chicken the same way. Making your own fried chicken is rewarding, relaxing, and a sensory experience that shouldn't be missed. You should try it sometime, you might just like it, you will probably even love it.

Ingredients:
3 eggs
2 T Hot Sauce (like Tobasco or Franks)
2 C All Purpose Flour
2 lb Chicken - I used boneless, skinless, breasts cut into thick strips
Salt and Pepper
Garlic Powder
Vegetable Oil (enough to come half way up the side of the chicken pieces in the pan)

In a large skillet, heat the vegetable oil to 375 degrees. If you don't have a thermometer, use the end of a wooden spoon. If bubbles form around the spoon when you dip it into the oil, you ready to cook!


While the oil is heating you can get your breading station ready. In a shallow bowl, beat the eggs with 1/3 C water and add the hot sauce. In another shallow bowl, mix the flour, salt and pepper, and garlic powder. I would say about 1 t Salt, 1/2 t pepper, and 1/2 T Garlic Powder but you can use more of any if you don't think it is enough.


Roll each piece of chicken in the egg and then into the flour and then into the oil. Cook, covered for 4 to 5 minutes. Remove the cover and turn the chicken when the undersides are well browned.
That could be right away if you are doing chicken strips like me. If you are doing a whole bone-in chicken, this would take longer. Cook, covered for another 5 minutes.
Remove the cover and cook until the chicken is well browned. An entire chicken will take 20 to 25 minutes to cook (making sure to put the largest pieces and dark meat into the pan first!)

Place the chicken onto a cloth or, if you insist, paper towel, to drain.


I followed a friend's green bean recipe that can be found here. GIANT Shout out to Amy for the tip on the seasoning. I NEVER had it before and it is delicious.

Thursday, April 1, 2010

Birthday Spaghetti

My son's 2nd Birthday was on April 1st and his favorite meal seems to be spaghetti so I made extra special sauce in the crock pot all day long. To a regular jar of sauce, I added 1 lb lean ground turkey, 1 C chopped baby carrots, 1 C baby spinach, and 1 C chopped mushrooms. Just before serving, I used my immersion blender to better disguise all of those veggies :).

With this, we had garlic toast and birthday cake for dessert...but no salad because that was practically in the sauce!

Chicken Stuffed with Sundried Tomatoes, Pine Nuts, Goat Cheese, and Basil


This is a delicious recipe that I got from Cooking Light Magazine when I commuted on the train from Baltimore to DC in 2003. I actually remember finding the recipe and making plans to cook it while I was on that train.

This is another meal that the kids aren't warming to so they enjoyed simple grilled chicken with the orzo tonight.

Chicken Stuffed with Sun dried tomatoes, goat cheese, and pine nuts
Serves 6
Ingredients
1T olive oil
1.5 C sun dried tomatoes (not in oil) – sliced
1/4 C toasted pine nuts
6T goat cheese
1 T Freshly chopped fresh basil
1 ENORMOUS boneless skinless chicken breasts sliced down the center. Seriously, check out this giant chicken breast!

Instructions
Soak the sun dried tomatoes in hot water until soft. In a skillet, toast the pine nuts.
Once toasted, remove from heat and add the drained tomatoes, goat cheese and basil.
Honestly, you could stop here, grab a cracker, and eat this while washing it down with a glass of red. I wouldn't be angry but your family may. Go ahead with the recipe for tonight by consider spreading this stuffing on some toasted bread for your next appetizer party.

Slice the chicken from the thick end to the thin end and stuff with a spoonful of the tomato mixture.
Press to secure the stuffing in the chicken. If necessary, use toothpicks to secure.

Place chickens in a greased skillet over medium heat covered. The chicken will release a lot of juice and when they are almost done, open the lid and allow some of the liquid to cook out. They are done in about 20 minutes depending on the thickness of the breasts.


Orzo with Pine Nuts, Basil, and Parmesan Cheese

Serves 6
Ingredients
1T Olive Oil
2C Orzo pasta
1/4 C toasted Pine Nuts
1/4 C freshly grated Parmesan Cheese
3C Chicken Broth (or water)
4 Basil leaves
Salt to taste

Instructions
In a large skillet, heat olive oil and pour in about 2 cups of Orzo. Saute until the orzo just starts to turn golden.
Add the pine nuts and gradually add the liquid, stirring until it is absorbed by the orzo. Continue to stir and add the broth until the pasta is al dente.
Incorporate the cheese and top with the shredded basil. Season with Salt to taste. Note: You may need more or less liquid for the pasta to cook completely depending on the brand you buy.